

Welcome back! In the first part, we explored why effective implementation is a game-changer in mining. We got a sneak peek into the Demand Triangle. Now, it’s time for you to roll up your sleeves and dig into the nuts and bolts of how this framework works and how you can practically apply it in your mining operations. Your role is crucial in this process.
The red arrows: the path often taken
Let’s start with the common pitfalls. Picture this: in many mining operations, the Boss, eager to see improvements, directly makes demands of the Business Improvement (BI) Manager (the Support Manager in our previous article). The logic seems sound—the BI Manager is the professional in charge of improvements, so they should handle it. Well, not quite.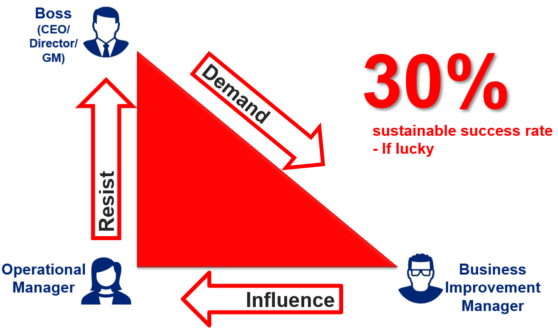
The BI Manager, keen to please, jumps into action. They spend a lot of time trying to influence the Operational Manager, using every trick in the change management book to get things moving. Sometimes, the BI Manager is an outsider, perhaps from a corporate office or consultancy, which means they first have to build relationships to have any influence. This can be a long and laborious process.
When the Boss requests updates, the Operational Manager often resists. This resistance can be active, with clear objections about lack of resources or support, or passive, where they nod in agreement but secretly sabotage progress. The result? Progress is either painfully slow or completely stalled. The Boss then demands more from the BI Manager, asking for additional resources, tools, and support to get the project back on track. This cycle keeps repeating until the project either fails spectacularly or gets completed very late, often too late to be relevant.
Projects that follow these red arrows usually have a success rate of around 30%, which is quite optimistic. However, this approach can damage professional relationships and give the operation a reputation for failing to deliver on promises. It also removes ownership from the people driving the project, leading to sterile projects or limited benefits. Thus, the chance to continuously improve a core competency is lost.
The green arrows: charting a new course
Now, imagine a different approach. What if the Boss directed their demands to the Operational Manager instead? This simple change can transform the whole process. When the Operational Manager feels responsible, they’re more likely to be passionate about the project. The Support Manager’s role shifts to providing assistance when requested, not pushing for changes.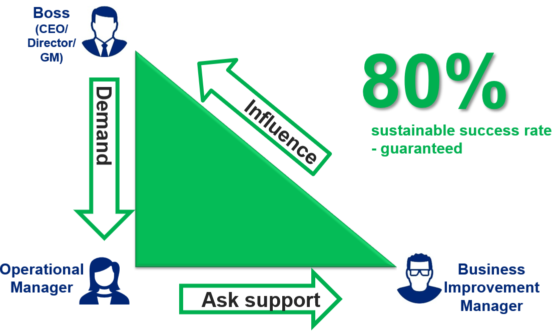
This approach, represented by the green arrows, significantly increases the chances of success. But how do we make this work in practice? Let’s break it down with a practical example.
Practical example: implementing new technology
Let’s say your mining operation needs to implement a new technology, such as a digital mine management system, to improve productivity. Here’s how it usually goes wrong with red arrows and how it can go right with green arrows.
Red arrow approach:
- The General Manager (Boss) tells the BI Manager (Support Manager) to implement the new technology.
- The BI Manager pushes the Production Manager (Operational Manager) to adopt the technology.
- The Production Manager resists, citing operational pressures and lack of resources.
- The General Manager increases pressure on the BI Manager, creating a cycle of frustration.
Outcome: The project stalls, relationships get strained, and the technology either needs to be completed or better implemented.
Green arrow approach:- The General Manager directly tells the Production Manager to implement the new technology.
- The Production Manager, feeling responsible and supported by the BI Manager, integrates the technology into daily operations.
- The BI Manager provides necessary tools and assistance upon the Production Manager’s request, fostering collaboration.
Outcome: The project moves forward smoothly, with the Production Manager taking ownership. In this context, ‘ownership’ refers to the sense of responsibility and accountability the Operational Manager feels towards the project. This leads to timely and effective implementation, as the Operational Manager is more likely to be proactive and committed to the project’s success.
Rule 1: Get the Demand in the right direction
The first rule of the Demand Triangle is ensuring the demand is directed correctly. In this context, ‘demand’ refers to the specific requirements or expectations that the Boss has for a project. The Boss must understand that the project will fail if they don’t deliver their needs to the accountable person. Without this demand, there’s no ownership. Without ownership, the Operational Manager is unlikely to make the necessary changes, especially when production pressures come into play.
Rule 2: Don’t offer unsolicited help
This rule is tricky, especially if you’re passionate about helping people. But it’s necessary. Offering unsolicited help can disrupt ownership. Only provide support when asked, ensuring the Operational Manager maintains control and ownership.
Rule 3: Influence upwards, not sideways
If demands are misdirected, the BI Manager should guide the Boss in redirecting them correctly. This must be done subtly to avoid appearing to undermine the Operational Manager. Building a strategic, consultant-client relationship with your Boss helps nurture this dynamic.
Applying the Demand Triangle in project planning
When planning a new initiative, draw a Demand Triangle for each project. This helps visualise roles and ensures demands are directed appropriately.
Step 1: Identify key stakeholders
Step 2: Establish clear communication channels
Step 3: Create a Demand Triangle for each initiative
Conclusion
The Demand Triangle is not just a theoretical model; it’s a practical tool that, when applied correctly, can revolutionise how projects are implemented, driving significant positive change in the mining industry. By adhering to the green arrows, respecting the roles, and applying the Demand Triangle, you can significantly increase your project’s chances of success. In the next part, we’ll delve into the specifics of planning and navigating these triangles to ensure seamless implementation. Stay tuned!